MerCstuff.
Com
![]()
MerCstuff.
Com
|
|
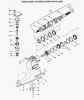
Gear End Yoke Seal ReplacementThis page is for Pre-Alpha, Alpha One and Generation II drives. The replacement procedure is basically the same for Bravo but the parts will be different.
To replace this seal on a Pre-Alpha, Alpha One and Generation II drive, you must place the shift lever in forward gear on standard rotation drives and remove the outdrive. ( On a counter rotation drive, it must be placed in reverse ).
Before
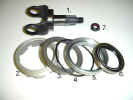
reassembly, you must now determine if the 2 large double bearings have a smaller
2 1/4 OD by 1 7/8 ID by 1/4 inch thick, inner spacer in-between them. If you do
have the inner spacer, the bearings will easily slide off of the
drive gear. If they do not slide off of the gear, they are pressed onto the gear
( do not force them off ). If they slide off easily, there
has to be an outer spacer and an If the bearings did not slide off of the gear, they are pressed onto the gear. Newer gear sets do not have an inner spacer to set the pre-load on the bearings. They use the 15/16 nut to draw the 2 bearings, which are pressed onto the .0015 oversized diameter, together. This is why you put 2 marks on the end of the yoke. You can reassemble all of the components, with the new seal, in the reverse order from which you took them apart. Put a drop of loctite on the threads and place them all back in the vise but DO NOT TORQUE THE 15/16 NUT because you will burn up the bearings. You must only tighten the nut back to the 2 alignment marks. Now lightly turn the bearings to see if you have 2 to 4 inch pounds to make the bearings turn. If they seem to loose, you can go past the 2 marks slightly to see if it makes them snug up a little. If you over tighten the nut, you will have to take everything apart and use a bearing separator to pull the last bearing away from the outer space slightly and start all over. Once this is done, you can put the shims back inside of the hole in the upper housing and slide the engine driveline assembly back in. If you have a retainer nut wrench with the 1/2 square hole in the end of the handle, you can torque the 3 7/8 nut down to 120 foot pounds. The nut requires 200 pounds of torque, but if you multiply the length of the wrench it comes out to 120 foot pounds. If you do not have a wrench with the hole, you can hit the wrench a couple of times with a good sized hammer and it should be ok. Click here for replacement parts and prices.
|
|
Home Page
Order
Parts
Email US
|


 MerCstuff,
llc
MerCstuff,
llc 